Friday, November 18, 2016

Search For The Holy Grail - The Best Napoleonic Rules, Part 6

Search For The Holy Grail - The Best Napoleonic Rules, Part 6

Shako 2


I am probably jumping into the lion's den with this one. Shako 2 (as well as the original version) is one of the most popular Napoleonic rules sets in the world. I have dabbled in the past with these rules, but never grew interested enough in them to pursue them on a deeper level. I have had several requests for a review of Shako 2, so I decided to finally spend a couple of weeks learning the rules and playtesting them thoroughly. Although I am not an expert with these rules, I did dive pretty deep and feel confident that I now have at least a basic understanding.

I found that there are many admirable, if not brilliant, concepts contained in the rulebook. I also found that there were also some characteristics of the rules that were a bit too abstract for me and detracted from my own gameplay experience. Now I know that Shako 2 has hundreds, if not thousands, of devoted players who claim that it truly provides the finest Napoleonic gaming experience available.  It is definitely a solid set of rules and it works for many, many gamers.  I also found that it works best as a grand-tactical Napoleonic game rather than a smaller, tactical game. 

I'd like to first describe the rules and its mechanisms. At the end of the review, I will summarize the specific things I liked and did not like about Shako 2.

Shako 2 can be used for large or small games on the tabletop


Scales

According to the rulebook, there is no specific figure scale. Each battalion of infantry, regiment of cavalry, or battery consists of an approximate "average-sized" Napoleonic unit. For example, a battalion of infantry on the tabletop is considered to have a numerical strength of between 400-800 troops. Larger units, such as Austrian line infantry units containing 1,000 or more soldiers, are covered (they can absorb an extra "hit"). Interestingly, smaller units are not included; the inference is to combine smaller units into an average-sized battalion. The time scale is considered to be 20-30 minutes per turn. As for ground scale, although I scoured the rules, I could not find any reference to number of yards per inch.

Base sizes are not critically important, although several methods of basing units are portrayed.

One of the first things that I look for in a set of rules is the section on game scales. I found it a bit frustrating (and interesting at the same time) to see such abstraction in this area. Of course, this could be my own obsessive-compulsive fondness for details and shouldn't be taken too awful seriously.

Units are then organized into "divisions," which can be 4-12 units strong. It's interesting that these "divisions" can range from brigades, actual divisions, or even small corps. Again, for a detail-minded fanatic like myself, I prefer a logical regiment-brigade-division-corps command structure. The "divisions" in Shako 2 allow gamers to generically create commands for convenience of play. The "army commander" can be either a division commander, corps commander, or true army commander, depending on the scope of the game.

Unit Ratings

Unit ratings are grouped into morale classes with each class containing an MR/DisMR rating. The MR (morale rating) is used when conducting melee, rallies from "stagger" or "fall-back" situations, and when conducting special maneuvers such as hasty formation changes. The DisMR (disordered morale rating) is used when conducting melee at a disadvantage (such as being attacked on the flank). The infantry morale classes range from "guard" to "unreliable." Cavalry morale classes are based on heavy, line, or light cavalry types, but also include "second rate" and "unreliable." Artillery is classified as heavy, foot, or horse guns.

The MR ratings also reflect the number of casualties that a unit may absorb before being dispersed and picked up from the table. For example, a regular line infantry battalion with a 4 MR can take 4 hits either due to fire or melee before disappearing off of the table. Large units may take an extra "hit," although its morale rating remains the same for other calculations. All artillery batteries can only absorb 3 hits total and are then removed from the table.

When rallying or conducting special maneuvers (ex. hasty square), a six-sided die is rolled. If the die roll is equal to or less than the unit's MR, than the rally maneuver attempt is deemed successful. Charge distance modifiers are added to this roll.

It is important to note that a unit's initial MR does not change even when taking "hits."  For example, a light cavalry unit with an initial MR of 4/1 that has taken 2 "hits" still has a morale rating of 4 for purposes of rallying, melee, or special maneuvers.

Specific game concepts

Tactically, action with the enemy revolves around a unit's frontal zone, which is a 6" zone that extends from the unit's flank lines outward. If two opposing units are in one of the other's frontal zone, than the units are considered to be "in contact." This is important not only for "divisional" orders, but also formation changes as well.  This concept is similar to the pinning zone in DBA and other similar games.

The concept of "stagger" is also important. This is intended to demonstrate a temporary state of disruption and can be caused by skirmish fire, or musketry/artillery fire.  Typically, a unit that is "staggered" gains a negative modifier to almost anything that it does. During the rally phase, if a unit is outside of an enemy's frontal zone, than a "stagger" can be rallied off.

Turn Sequence

This is pretty straight-forward.

1. Artillery Fire or Evade
2. Initiative / Movement phase
    a. Conduct support charges for allowed units
3. Musketry phase
    a. Skirmish fire first
    b. Volley fire
4. Melee
    a. After melee resolution, conduct breakthroughs, recalls, and countercharges
5. Command phase
     a. Change orders and send ADC's
     b. Rally and reform units
     c. Rally divisions
     d. Check division morale
     e. Check scenario victory conditions

Walking through the turn sequence, I didn't have any issues with it. It was a simple and logical process to conduct a game turn.

Artillery Fire or Evade

Artillery fire is conducted via 3 range bands: Cannister, Effective, and Long. It does allow a gamer, by using the pullback method, to fire ball shot even at close ranges in order to maximize bouncethrough fire onto tightly packed divisions. Counter batter is also represented on the artillery fire table.

I found it interesting that artillery batteries could also "evade" from the front line instead of firing. When I began conducting melees I quickly found out why: artillery batteries are pretty fragile when charged by formed infantry or cavalry (a last ditch canister volley is included though, to be fair).  Therefore, knowing when to evade with artillery batteries is definitely an important part of tactical decision-making in Shako 2.

Initiative / Movement

Instead of a card-driven method of moving "divisions" or a strict "UGO-IGO" process, Shako 2 uses a six-sided die roll for each division to identify what formations move first. All divisions that rolled a "6" move simultaneously, after that divisions that rolled a "5" move,  and so on.  So, opposing players may be moving divisions on opposite sides of the table at the same time. If directly opposing divisions roll the same initiative number, the division on attack orders moves first.

Movement is very straight-forward, with each type of unit moving a maximum distance per turn. No surprises here. There is no charge movement bonus. Charging units are simply moved into contact with an enemy unit. There are terrain effects upon movment and wheeling a unit costs double (skirmishers excepted--they move much more freely).

At the end of regular movement, units that moved 1/2 or less of its movement allowance are able to conduct "support charges," which basically allow a player to exploit situations or to counter enemy maneuvers during the regular movement phase.

Musketry

Skirmishers are fired first. I found that skirmish stands in Shako 2 seem to perform in a historically accurate way. They are not overly powerful, but they are irritating to the enemy and have to be dealt with. Besides the ingrained skirmishers that form a chain for each "division," entire infantry battalions may break down into 2 skirmish stands instead of remaining formed.

Musketry occurs next and affects all enemy units in its frontal zone (only if there are gaps; a formed unit does block pass-through fire if a unit is directly behind it). There is no oblique fire.....just straight ahead. Musketry tends to be very bloody and decisive in Shako 2. A typical infantry battalion that can only absorb 4 "hits" will only last for so long when trading volleys with an enemy unit.

Melee

Melee is also very straight forward.  Basically, one compares the MR's (or disordered MR if it applies) of opposing units, add or subtract any tactical modifiers, and then throw one six-sided die. The difference in points determines the number of "hits" and the winner/loser. The loser then falls back "staggered" a particular distance. Typically, if an infantry unit out of square loses to cavalry, it is considered dispersed. Ditto for an artillery unit that loses any melee.

Cavalry breakthrough charges, recalls for cavalry, and countercharges are all covered within the rules. It's nice that, although cavalry has the potential for powerful results, its endurance is covered within the mechanisms of Shako 2.

Command Phase

The command phase is the section of the turn that brings it all together. Order changes, unit rallies, and divisional morale checks are conducted.

Order changes are conducted through the movement of ADC's from the Army commander. To replicate command and staff efficiency, army commanders of each nationality may differ on the number of ADC's available each turn. A die roll to see if the ADC was killed or only moved halfway is conducted during this turn. Certain nationalities with only one ADC (1805 Russians and Austrians are but 2 examples) can find the activation of reserves or changing of other orders frustrating. Conversely, the French typically have up to 4 ADC's per turn available and can afford to send multiple ADC's to a division to ensure delivery of orders. This system is one of the most effective, yet incredibly simple, command and control gaming mechanisms that I have seen. Ingenious.

As far as unit rallies go, this process can prove devastatingly decisive. If a unit previously lost a melee and fell back, it must be rallied. If it fails just one rally attempt, it is considered dispersed and picked up from the table. This phase is incredibly important and can make or break the game. I'm used to units in more tactical games continue falling back until actually off the table before dispersing. In Shako 2, the author does not play around; a unit either reforms or it is gone.

Divisional morale checks based on dispersed units also occur, which is a strong point of the rules. Too many rules do not contain higher formation morale checks. I was very happy to see that it is contained in Shako 2.

Personal Likes and Dislikes

As with any rules system, I found many areas of Shako 2 that I felt were very solid. And with most rules systems, there are a few things that I had a hard time wrapping my head around. Here are my personal observations:

I particularly admired the following:

1. The divisional orders/changing orders system is simple, yet highly effective. Divisions on Defend basically hold in a designated area tied to a geographic feature. Divisions on Attack must advance until at least one formed unit comes into "contact" with the enemy (within a unit's frontal zone). Divisions on Reserve are held motionless until activated. As for changing a division's orders, the use of ADC's as a measure of staff efficiency or national tactical philosophy (Linear vs Napoleonic in some systems) is excellent.

2. The modifiers for melee and firing make sense. I never found myself shaking my head trying to figure out what the author was thinking.

3. I feel that the support modifiers replicate the tactical differences between Linear and Napoleonic philosophies nicely. In order to receive positive modifiers for flank or rear support during melee, it literally forces a player to fight with his army as it historically fought.

4. I liked the fact that an attack path has to be planned in advance and drawn onto a map of the table. This allows for an oblique approach or a feint in a specific direction, yet has to be pre-planned by the division commander.

5. Using the artillery "pull-back" method accurately creates a historically accurate "beaten zone."

6. The rules for "hasty squares" and "hasty lines" within an enemy unit's frontal zone seem absolutely "right" to me.

7. The critical concept of Divisional morale is included.

I struggled with the following concepts:

1. There does not seem to be any emphasis on a particular ground scale. Musketry and artillery ranges seemed accurate at first sight, but did not seem to match up with unit movement. I felt that units moved too little during what was supposed to be a 20-30 minute turn. Add in the factor of "no particular figure scale," and it all felt a bit too vague and abstract for my taste.

2. Initiative seemed gamey. Although I liked the fact of rolling a six sided die for random movement for divisions, there was no concept of "momentum" on the gaming table that systems like Carnage and Glory 2 excel in. Also, divisions that rolled "6's" were not always at an advantage by moving first.

3. Artillery seemed too fragile when charged, especially when compared to musketry. Units charging a battery did not receive defensive fire; the battery used their MR in melee to replicate a last-ditch canister fire. When a unit charged infantry, they not only had to endure a defensive volley, but were halted before contact if this defensive volley caused a "stagger." 

4. There were no "passage-of-line" rules for interpenetration.

5. Melee seemed too luck-based for my personal taste. Although the melee modifiers made sense, the addition of just one six-sided die could cause extreme results. But, in fairness, this "luck factor" is what pulls many gamers into the fold.

In summary, I found Shako 2 to be a well-researched rules system that works well on the tabletop, especially for grand-tactical scenarios. Although there is an admirable  amount of detail within certain aspects of the game, the ambiguity of figure scale, ground scale, and unit size seemed much too generic and fuzzy to me.

I rated Shako 2 in the area of playability a 6.5 out of 10. For historical accuracy, I also rated Shako 2 a 6.5 out of 10. My total rating is therefore 6.5 out of 10, a very solid set of rules that continues to be very popular worldwide.


Sunday, November 13, 2016

Battle of Olper, August 1st, 1809


The Battle of Olper, August 1st, 1809


Brunswick infantry


In the mood for a small pick-up game of Carnage and Glory 2, I was flipping through one of my scenario books from the General de Brigade system and found an interesting action which called for less than 10,000 actual troops on the table. Luckily, I just recently started to collect a Westphalian army.  This was a perfect small scenario to set up in the garage.


Black Brunswickers ready for the advance !


Westphalian conscripts form lines against advancing Brunswick columns


The Scenario

This action featured a mixed division of Westphalian infantry and cavalry against a smaller Brunswick force that was attempting to break out from the large town of Braunschweigen. It was a classic battle between a larger, yet inexperienced, force against a much smaller, but veteran in quality, formation. Total Westphalian troops numbered slightly over 5,000 while the smaller Brunswick force numbered about 2,800.

Due to the defeat of the Prussians at Jena and Auerstadt, the Duchy of Brunswick was declared null and void by the Emperor Napoleon, who ceded its territory to the new Kingdom of Westphalia. Frederick William, the son of Duke Charles William Ferdinand (mortally wounded during the Jena campaign) resisted Napoleon's decree and organized a small force of 2,000 troops and then promptly offered their service to the Austrians in the great war of 1809. Following Austria's defeat at Wagram and ultimate surrender, the new Duke of Brunswick attempted to march through northern Germany in order to sail his troops to England and continue the struggle against Napoleon. Having captured the towns of Halberstadt and Braunschweigen, a Westphalian division marched to block Frederick William's advance to the coast and the waiting British fleet. To make matters worse, Dutch troops from the direction of Halberstadt were also marching to catch the Brunswick force in a pincer move. Frederick William decided to attack the Westphalians in the direction of the village of Olper and force his way to the coast.

The Brunswick force deployed on the outskirts of Braunschweigen, with the cavalry supporting the left flank. Opposite this position, the Westphalians under General Reubell deployed on the heights overlooking the town of Olper, with the Berg infantry protecting the village. The Westphalian cuirassiers protected the Westphalian right flank next to a large section of wooded terrain.

The Historical Battle

Although the Black Brunswickers initially occupied Olper, they then abandoned it to the Westphalians. The Brunswick troops then aggressively attacked the white-coated Westphalians on the heights. The Westphalian conscripts held firm and the spirited (but small in number) Brunswick troops had to withdraw. The battle was technically a tactical draw, but Reubell's Westphalians strangely abandoned the field during the night. Casualties were very light with only 100-200 casualties on each side. The following morning saw the Brunswick force march to meet the British ships and embark for England. Although General Reubell halfheartedly pursued the Brunswick troops, he was unable to keep the Brunswickers from escaping. Napoleon sacked Reubell for his failure but the General safely escaped to America.

As a postscript, the Black Brunswickers accompanied Wellington's troops in the Peninsular campaign in Spain for years afterward and were also heavily engaged during the Waterloo campaign.

The Game

I wanted to use Carnage and Glory 2 in order to demonstrate the system's ability to handle smaller actions as well as larger battles. The terrain, courtesy of Doug Kline's Battlefield Terrain Concepts, was set up on a 6' x 5' table. Although I had more than enough Brunswick troops to put on the table, I had to use French carabiniers in place of the Westphalian cuirassiers (I'm sure true grognards will notice this from the pictures, so I wanted to be honest about that up front).

Having deployed all of the troops, I noticed that the Westphalian troops in the vicinity of Olper had nice defensive terrain, so I endeavored to avoid this sector and focus on the Westphalian troops in the open.


Initial deployment on the table. Brunwick troops are on the bottom and the Westphalians are deployed in the vicinity of Olper


As the Brunswick force advanced to engage the Westphalians, the Westphalian cuirassiers moved up quickly to anchor Reubell's right flank. The Brunswick hussars then engaged the cuirassiers in a multi-unit charge. 


Westphalian cuirassiers versus Brunswick Hussars

In direct contradiction of my plan, I found the town of Olper was a magnet for a couple of my Brunswick battalions. I found myself totally sucked in to this position and heavy casualties began to mount in the firefights in this sector.


Olper proved to be an irresistible objective and heavy casualties were suffered here

Meanwhile, although the Brunswick Hussars were victorious against the opposing cuirassiers (conscript cuirassiers mind you) the fatigue was already starting to set in among the cavalry. A battery of Brunswick horse guns unlimbered in front of the white coats and were beginning to pummel the Westphalian conscripts. A couple of Westphalian units on the right flank formed square in order to keep the victorious Brunswick cavalry at bay, and suffered even more casualties from the Brunswick guns for their trouble. Meanwhile, a small unit of Brunswick uhlans was searching for a target in the center. 

Artillery on both sides open up

As the cavalry were attempting to creep around the Westphalian right, the main fight continued to erupt around the town of Olper, with the Brunswick troops actually getting the worse of it due to the Berg infantry's superior defensive position. In the center, the Westphalian conscripts began to waver due to the rising casualties from the Brunswick guns, but were replaced by the second line of infantry in order to continue the fight. On the Westphalian right, fatigue really set in among the cavalry and the Brunswick hussars found themselves restricted in their pursuit of the defeated Westphalian cuirassiers (who at this time were beginning to rally and rejoin the fight).

By turn 6, the infantry around the village of Olper were beginning to waver (on both sides). Most units in this sector received "halt in disorder" markers. In the center, the Westphalian numerical advantage was beginning to make a difference, as the supporting second line of infantry began to take its place in the front line, while the Brunswick horse battery was beginning to fatigue noticeably.


Units around the village of Olper begin to waver

The Westphalian infantry, although restricted in movement, began to boldly advance in the center and right flank to put fire onto the Brunswick cavalry. The uhlans and hussars accordingly maneuvered out of musketry range. The use of Westphalian infantry in squares on the flank effectively blocked any Brunswick cavalry thrust in this sector.


The Westphalian conscripts hold their ground and even advance boldly in the center


On turn 8, the move of the game occurred. The Brunswick horse battery, considerably fatigued, in the center failed to notice a Westphalian infantry battalion that had slowly maneuvered onto its flank. When the Westphalians charged, the battery was caught in place. In the ensuing melee, the battery was completely lost and the conscript infantry victorious !  With the right flank secure, the center actually advancing, and the Brunswickers fleeing in front of Olper, the battle was essentially over.


Westphalian infantry charge into and capture the lone Brunswick artillery battery


The Westphalians held their ground against a veteran and highly motivated enemy. The Brunswick troops would retreat back into Braunschweigen in order to regroup for another attack. Total casualties were about 250 Westphalians and 540 Brunswickers (including the only Brunswick artillery battery).

This was yet another example of Carnage and Glory 2's flexibility and "elegance" for any size battle. The battle for Olper provided a break from the typical "French vs Allies" scenario and provided a highly entertaining game as well. German versus German........interesting.

Here is the complete order of battle:

Division Reubell - Attack
  [ 101] Generalmajor Reubell - Active C+ [800 paces]
    Brigade Scharnner - Attack
    [ 102] Generalmajor Scharnner - Active C+ [400 paces]
 [ 101] 1/1st Westphalian Line            0/ 587      C- [sk-]    
 [ 102] 2/1st Westphalian Line            0/ 580      D+ [sk-]    
 [ 103] 3/1st Westphalian Line            0/ 606      D+ [sk-]    
 [ 104] 1/6th Westphalian Line            0/ 497      C- [sk-]    
 [ 105] 2/6th Westphalian Line            0/ 481      D+ [sk-]    
 [ 106] 3/6th Westphalian Line            0/ 500      D+ [sk-]    
    Brigade Wickenberg - Attack
    [ 103] Oberst Wickenberg - Active C+ [400 paces]
 [ 109] 1/3rd Berg Line                   0/ 594      C- [sk-]    
 [ 110] 2/3rd Berg Line                   0/ 627      C- [sk-]    
 [ 111] 1/1st Westphalian Foot Battery    0/ 200 [ 8] C-          
    Regiment Schwimmer - Attack
    [ 104] Oberst Schwimmer - Active C+ [200 paces]
 [ 107] 1/1st Westphalian Cuirassiers     0/ 178      C-          
 [ 108] 2/1st Westphalian Cuirassiers     0/ 186      C-          
 Strengths:
  losses/active
       0/  4472 Bayonets
       0/   364 Sabres
       0/   200 Artillerists
       0/     8 Cannon
       0/  5036 Total of all arms
              4 Colors present


Division Wilhelm, The Duke of Brunswick - Attack
  [ 501] Generalleutnant Wilhelm, The Duke of Brunswick - Active B [875 paces]
    Brigade Burnmeist - Attack
    [ 502] Generalmajor Burnmeist - Active B- [400 paces]
 [ 501] 1st Brunswick Inf.                0/ 640      C  [sk-]    
 [ 502] 2nd Brunswick Inf.                0/ 669      C  [sk-]    
 [ 503] 3rd Brunswick Inf.                0/ 666      C  [sk-]    
 [ 504] 1st Brunswick Jagers              0/ 247      C+ [sk+]    
    Brigade Runkel - Attack
    [ 503] Generalmajor Runkel - Active B- [400 paces]
 [ 505] 1/1st Brunswick Hussars           0/ 187      C  [sk+]    
 [ 506] 2/1st Brunswick Hussars           0/ 183      C  [sk+]    
 [ 507] 1/1st Brunswick Uhlans            0/ 120      C  [sk+]    
 [ 508] 1/1st Brunswick Horse Battery     0/ 150 [ 6] C           
 Strengths:
  losses/active
       0/  2222 Bayonets
       0/   490 Sabres
       0/   150 Artillerists
       0/     6 Cannon
       0/  2862 Total of all arms
              4 Colors present

Sunday, October 30, 2016

Search For The Holy Grail - The Best Napoleonic Rules, Part 5

A new rules system was recently released and, after reading some preliminary reviews, I quickly purchased a copy from Caliver Books. The beautifully-produced Over The Hills by Adrian McWalter and Quinton Dalton arrived shortly at my doorstep and I was immediately impressed.

I was itching to get the rules onto the table-top.

Over The Hills


First off, my initial impression was that the book is very professionally-produced and very nicely illustrated and photographed. After reading through the rules several times, I came away with the feeling that the authors wrote a solid set of rules that have been "inspired" by concepts contained in the many Napoleonic rules that preceded them. Now, that is not a bad thing in my opinion. Being a self-proclaimed rules junkie, I have slaved over my own house rules for about 20 years and have not been successful incorporating my own ideas with excellent gaming concepts from other rules systems. I think that the authors have succeeded in producing a very effective set of rules that play very smoothly.

Organization

The book begins with a multi-page background to the Napoleonic Wars (geared to the novice gamer in the period) and quickly moves to a discussion of the primary concepts of the rules. Troop types, unit ratings, basing, scale, command and control, and unit formations are all discussed in great detail. The turn sequence and basic rules are discussed, giving the gamer an excellent introduction into the flow and basic mechanisms of the system. At this point, one has all of the information to play out a game. The basic rules, in my opinion, would fit very nicely in a convention setting.....easy to learn, flows smoothly, plays quickly with a nice amount of period flavor. But, for the jaded gamer like myself who yearns for more grit and detail, the book adds the optional rules section after the basic rules.  This is where the basic concepts are fleshed out and adds an admirable amount of historical realism. The book concludes with several appendices, including a discussion of scale, the War of 1812, and historical deployments. The QRF, located at the very rear of the book, consists of 2 pages.

Basic Concepts

The question of scale is probably the first thing that I look at in a rules system. In Over The Hills, the number of figures per base is not important. The dimensions of a base are most important when it comes to ground scale and there are detailed recommendations contained within. The rules are intended for 25-28mm figures, but any size figures may be used and recommendations are included about ground scale when using smaller figures. An interesting concept of the rules is that any figure scale can be used, including 1:20, 1:30, 1:60, etc. The size of the base is most important; the number of figures on each base are really up to the individual gamer. For example, my 15mm figures are based at 1:30, therefore using the movement and fire distances contained in the rules, the ground scale ends up at approximately 35 yards to the inch. The time scale is not immediately evident, but in the author's appendix concerning scale, it is intended to be about 10 minutes per turn.

Tabletop units are portrayed as infantry battalions, cavalry regiments, and artillery batteries. Unit ratings are based on Elan (inspiration) and Grade (training). These ratings are combined with the actual number of combatants to yield a Fatigue score. The Fatigue score is the basic rating for each unit throughout the game. Although, I'm not personally a fan of unit ratings boiled down to 1 overall number, it does work and the game definitely revolves around the concept of the Fatigue score. It reminds me of the unit strength points rating in Sam Mustafa's rules or even that of March Attack (although MA also has a training rating that is used for discipline/morale tests). This Fatigue score is intended to be an all-encompassing rating that takes into account actual fatigue, casualties, and psychological wear and tear. The unit Fatigue score is affected by musketry/artillery casualties, melee, and movement through rough/broken terrain. Once a unit's Fatigue score reaches zero, the unit is removed from the table (although there are optional rules for units with low Fatigue scores -- routing and wavering units). What is interesting is that commanders can attempt to rally each turn to "add back" Fatigue points, which is useful in pushing a unit through woods or moving further than the basic movement allowance.

Command and Control

In the basic game, the command span for a brigade-sized formation is all-important. If a unit is outside this command span, movement or charges are unauthorized and Fatigue points may not be rallied. Commanders, depending on their rating, can attempt to rally Fatigue points for a certain number of units. In the optional rules, there is a section that discusses brigade and division orders and actions. The concept is actually very simple and effective.

The Turn Sequence

Side A and B are decided upon at the outset of a game. This is a concept that I'm not too keen on, as momentum may shift throughout the game; I am a proponent of an initiative roll at the start of each turn based on the current situation. A house rule can easily remedy this for those inclined. Once the order of movement is decided upon, the turn sequence is as follows:

1. Side A moves
2. Side A attempts to rally fatigue points
3. Side B conducts defensive fire
4. Side A conducts melee
5. Side B fires all remaining units
Steps 6-10   reverse sides and repeat steps 1-5

As one can see, the turn sequence allows for the non-phasing side to watch for defensive fire opportunities so it is not a strict UGO-IGO turn sequence.

Movement

Movement, for 25-28mm figures, is based on increments of 6 inches (for the 15mm figures that I own, simply modify down to centimeters). Depending on the type of formation or troop type (cavalry moves faster, for example), the number of increments that a unit may move varies. One concept that I truly like is the ability to move/push a unit an increment further, but accepting a Fatigue point penalty. Keeping in mind that commanders may attempt to rally Fatigue points (depending on unit's proximity to the enemy), this adds a nice tactical option.

Formation changes, depending again on the specific change, cost an amount of movement increments to perform.

Fire and Combat

Fire is based on Short range or Long range and utilizes the unit's current Fatigue rating and then rolled on the appropriate table. Using the basic rules, depending on the roll, a range of 0-3 Fatigue point casualties are inflicted. There is an optional rule that allows British infantry in 2-rank line to inflict up to 4 casualties.

Another concept that I really like is how skirmishers are handled. Each unit has a skirmisher score and when trading fire, the scores are compared. The difference between skirmish scores determine positive or negative modifiers on the fire chart. Typically, a unit with a higher skirmish score will have positive modifiers when firing at long range, while a unit with a lower score will suffer negatively at short range. Simple, yet effective....it's also a very subtle way of simulating skirmish effects without getting too low "into the weeds."  Some gamers prefer a separate skirmish phase, but I really like this concept that is ingrained into the overall fire phase. Fans of Lasalle or Napoleon At War will recognize this system.

Artillery fire is similar with canister and bouncethrough (optional rule) fully integrated in the mechanics.

Melee is conducted similarly and may last up to 3 rounds. Casualties are rolled on the Fire chart (with separate close combat modifiers) and then compared between opposing units. If a unit does not retreat or break before 3 rounds of combat, it is considered a draw and both units are retreated after the 3rd round.  Again, simple yet effective.

Cavalry combat, emergency squares, unit reactions when charged, evading, and more concepts are all contained and explained within the basic rules.

Optional Rules

Although the basic rules do give a good game, the details and flavor of Napoleonic tactics are fully explored in the optional rules. Incorporating some, all, or none of the optional rules is totally up to each player.

Without going into excruciating detail on all of the optional rules present, some examples include brigade and division orders, ammunition, the use of howitzers, more detailed skirmish rules, national characteristics and special rules, and even weather effects.

I found the optional rules very interesting and enjoyable to read through.

Summary

I put together a couple of tabletop games and put the rules through its paces. I found Over The Hills to be effective, very smooth-flowing, and easy to understand. I did utilize most of the optional rules (because I'm a detail-addict) in my games and they added a nice bit of flavor to the proceedings. I'm still not a fan of the all-encompassing Fatigue score concept of each unit's effectiveness, but I understand the concept and what the authors were attempting to accomplish. With that said, the games worked well and were enjoyable.

I think that these rules are especially useful for the introduction of new Napoleonic gamers to the period. These rules are very straight-forward, fun, and will not scare away any "newbies." With that said, the optional rules do add a very nice amount of grit, even for those grognards out there like me.

Thoroughly enjoyable and well-produced, my rating for Over The Hills is an 8 for playability and a 7 for historical realism, for a very solid overall score of 7.5.

Ironically, this is the same overall score as Black Powder (I had to look back at my previous review after I wrote this). I think the 2 rules systems give a similar playing experience, although both systems approach Napoleonic gaming in a different way.


Friday, August 12, 2016

Williamsburg, 1862 using Carnage and Glory 2


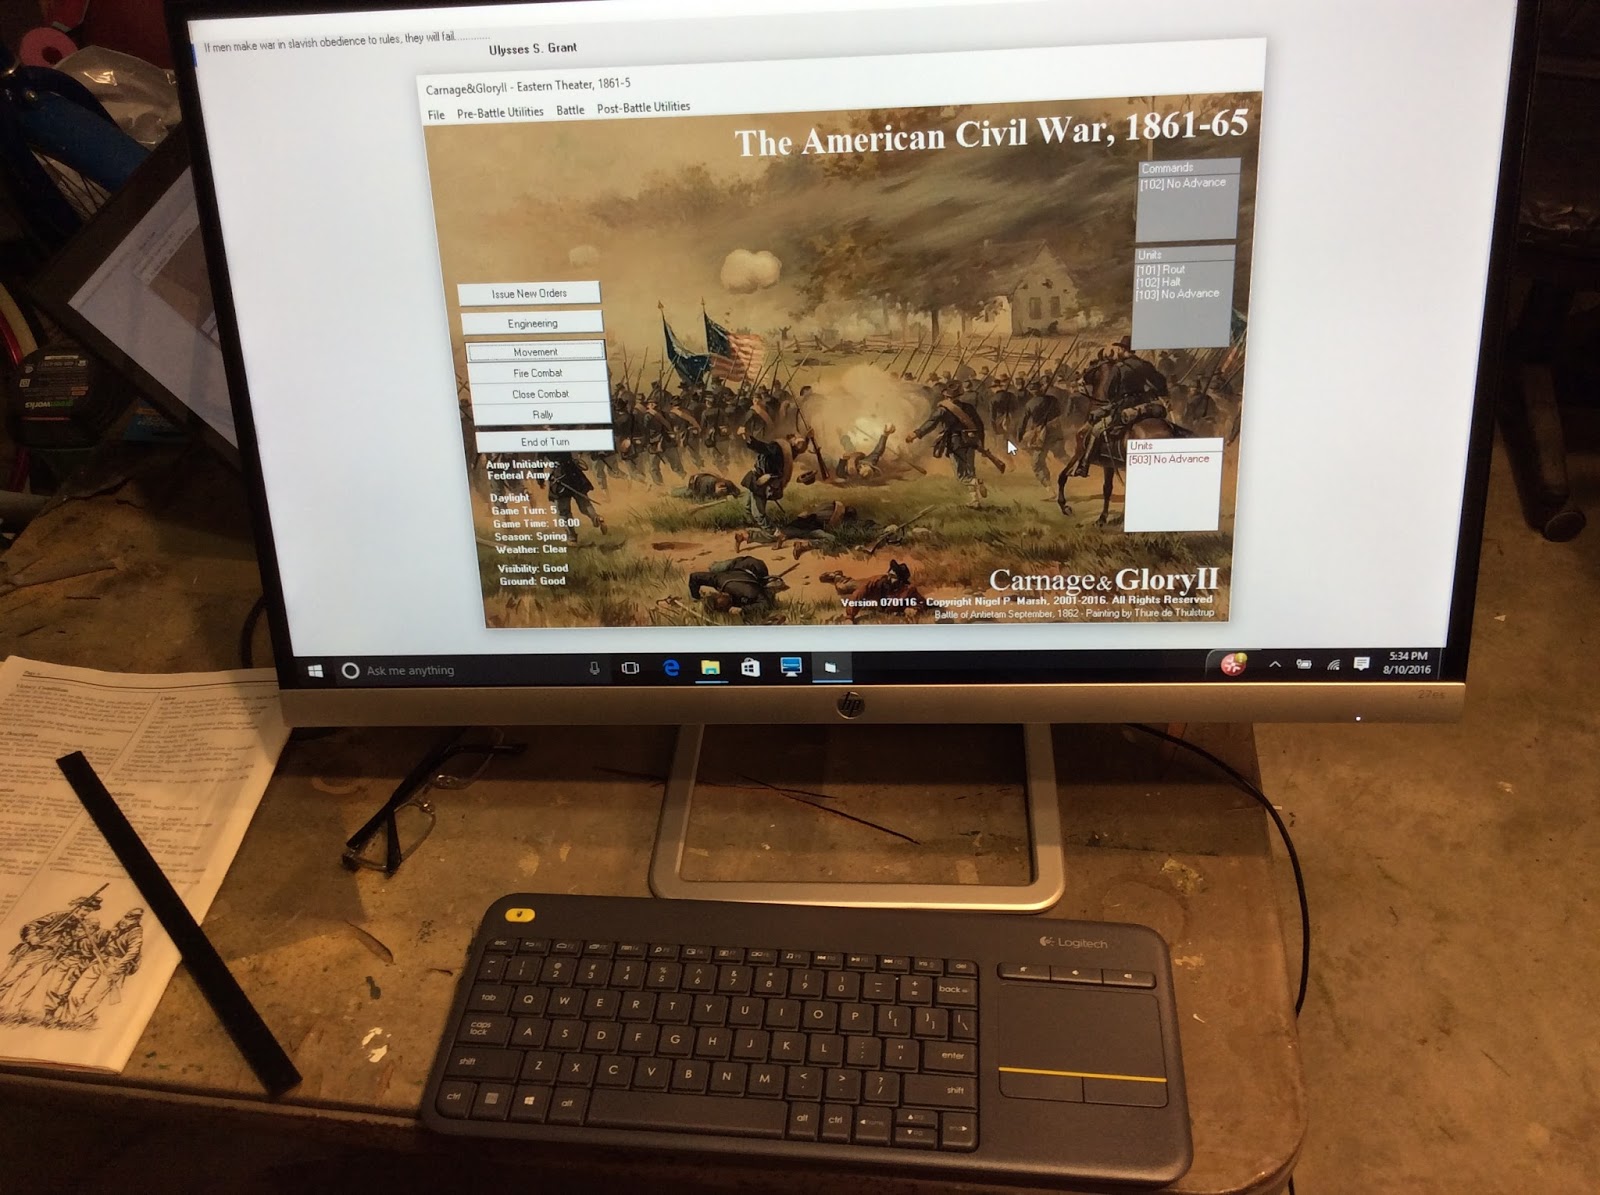
I recently convened to the garage for a small American Civil War battle.  I just purchased a 27” monitor and a wireless keyboard specifically for Carnage and Glory 2 and wanted to put the new gear to the test.  Nigel Marsh also released a large upgrade to CG2, so I was looking forward to testing it out as well.

I settled on an old Johnny Reb 2 scenario, the battle of Williamsburg (1862), which would fit perfectly on a 6’ x 5’ table.  The battle pitted a couple of brigades on each side, so infantry numbers were roughly equal. I actually ran the scenario twice, but the first game was too imbalanced with regards to Union artillery superiority and resulted in a decision that was foretold by turn 2.

For the second game, I brought the Union artillery in as reinforcements (in addition to General Davidson’s brigade) to General Winfield Scott Hancock’s isolated command. I left the artillery under the command of the Union division commander (General William Smith) while the Confederates focused their attack on Hancock’s brigade.  It seemed to really balance the game and it added some “pucker factor” to both sides by the end. One interesting side note is that this was one of Second Lt George Custer's first actions, who was attached as a staff officer to General Hancock. As happened historically, Custer was to prove very useful in rallying troops along the line in this game.

The upgrade to CG2 was very impressive, adding even more to an already superb gaming system. The upgrade not only added prompts and compulsory unit information for GMs, it added concepts like oblique fire for artillery, maneuver columns on or off road for infantry and cavalry, as well as new modifiers for firing and combat.  The upgrade was very large and added greatly to the enjoyment of the game. All this for a free download! In addition, my new equipment made all of the difference in the gaming experience as well. I could see and interact with the computer from every corner of the table.  I was ecstatic.

The new monitor and wireless keypad made data entry from any point on the tabletop a breeze. My laptop can be seen peeking out from behind the monitor screen. A big difference to these aging eyes.

The Scenario

The battle of Williamsburg occurred on May 5th, 1862 and it was the first major fight of the Peninsula Campaign (the march onto Richmond).  After McClellan's army was briefly delayed further southeast at Yorktown, Williamsburg evolved into a much larger battle, actually intended as a rear-guard action as the bulk of the Confederates continued on to Richmond.  The full battle consisted of approximately 40,000 Union troops versus 32,000 Confederates. The small fight on my tabletop portrayed the threat of Hancock’s command on the extreme left flank of the Confederates. The object of Hancock’s attack was a redoubt in which several mortars and Virginia militia occupied. When this threat was realized by the Confederates, General D.H. Hill rushed Jubal Early and Rains’ brigades to counterattack.  Seeing the Southerners' advance against his troops, Hancock placed two regiments on a wooded hill and waited for Early’s men to attack through an open field. Historically, Early’s attack went nowhere and Hancock actually counterattacked, putting the rebels to flight. Hancock, in violation of his orders to retreat, stubbornly stayed on the field and was credited with a Union victory on this front.  In our scenario, General William Smith (with the divisional artillery) marched with Davidson’s brigade to reinforce Hancock’s position. As Early’s men attacked Hancock’s troops, Davidson’s Union men and Rains’ Confederates marched to impact each other. 


Early's regiments line up against Hancock's position


Confederate mortars and Virginia militia man the redoubt to the left of Hancock's troops

As you can see by the pictures, there was a large amount of disordering terrain. The militia and mortars were fixed in position at the redoubt. Davidson’s troops were to arrive on the southern edge of Dam road on Turn 2, while Rains’ Confederates were marching in maneuver column on the northern edge of the road, arriving on Turn 3. The divisional artillery, under the command of General Smith, led the way in front of Davidson’s troops along the road.

The Game
Jubal Early’s Confederate troops were poised to advance across an open field towards Hancock’s position. The Union troops had the benefit of medium cover in the woods though. In the first game, Hancock simply placed his artillery on his right flank and caught the Confederate troops in such a brutal cross-fire while crossing the field, that the game was literally over when it began. This time, Early had a more promising chance of breaking Hancock’s troops.

Jubal Early's men advance

As Early’s men crossed over the fence line and skirmishers began to engage on both sides, it was evident that the Confederates would need to “bring it on home” if they had any hope of thrashing the Union troops in the woods. As Early’s troops continued to advance, General Rains’ brigade showed up a turn early and entered the table in maneuver column. Hancock’s left flank was dangerously in the air. The following turn, Davidson’s Union troops entered the southern side of the tabletop and moved quickly in maneuver column towards the redoubt. 

Rains' brigade enters the tabletop, threatening Hancock's left flank


Meanwhile, Davidson's troops, with the divisional artillery leading the way, advance to reinforce Hancock

Early’s brigade and Hancock’s brigade soon traded brutal vollies, with the Confederates taking the worst of it in the open field.  The 23rd North Carolina Regiment threw caution to the wind and charged (using the Indian Rush maneuver) the 6th Maine. The Union volley halted the Confederate charge and the North Carolinians stopped at 50 paces and went prone.  Heavy firing erupted all across the line, as Early and Hancock’s men suffered casualties.  Rains’ men, by this time, were advancing towards the flank of Hancock’s position in the woods.  Union artillery deployed in front of Davidson’s troops and began to put a withering fire onto the Confederates moving towards Hancock’s position. The Confederates, as well as Union troops, began to engage in the heavy woods on the Confederate right.

Rains' Confederates begin deploying against Hancock

The charge of the 23rd North Carolina falters in front of the 6th Maine


The combat becomes vicious as all of the troops become embroiled around the woods


At this point, with both North Carolina regiments in the front line of Early’s brigade wavering, Hancock ordered a charge and led the unit 6th Maine into the attack.  The Confederates were sent reeling, but the men from Maine found itself halted in front of the 24th Virginia (at this point, held in reserve)  which issued a nasty volley. 

The 6th Maine Regiment, pursuing the defeated North Carolinians, soon found themselves at point blank range in front of the 24th Virginia Regiment. A bloody firefight soon engulfed both units.

As the game wore on, Davidson’s Yankees maneuvered through the woods to support Hancock’s position and butted heads with Rains’ Confederates.  The 6th Georgia Regiment then charged through the woods, routing 2 Federal regiments (one of which was part of Hancock’s brigade, caught in the flank).  It looked like the Confederates were winning the battle in the woods.

The 6th Georgia Regiment advances through the woods as the 5th North Carolina Regiment trades murderous fire with the 5th Wisconsin Regiment

The charge of the 6th Georgia Regiment sends the Yankees running

After another turn, the Union side finally suffered a morale loss which precipitated a retreat off of the field. Hancock’s brigade was smashed, along with Early’s command. The remaining troops on both sides were heavily engaged but still in the fight. The game itself was fought over 8 turns and took about a good hour and a half to complete. 

Although Davidson's brigade was largely intact, the Union forces suffered a morale loss and began to retreat off of the field

Expecting a Confederate victory (the redoubt and the rest of the field continued to be held by the Confederates), the computer’s analysis surprised me with a Major Federal victory (even after walking wounded were factored in).  Even though the Confederates held the field, the Union troops under Hancock and Davidson inflicted casualties at a 3:1 ratio on the advancing Confederates.  The difference was the open field that Early’s troops had to advance through.  I thought that the victory analysis was interesting (and very surprising), yet after looking at the casualty lists, made sense from a historical standpoint.  The successful charge of the 6th Georgia Regiment notwithstanding, the Union forces simply outgunned the Confederates who were caught largely in the open.

So, taking a break from Napoleonics and Ancients, I am looking forward to more ACW, especially with Carnage and Glory 2.  As always, I really enjoyed the experience !

The casualty list:
The Southern Army has suffered losses of:
 [ 10%]    445 men of all arms
   incl.[  1%]     48 prisoners of all arms
 [ 11%]    445 bayonets
 [  0%]      0 artillerists
Honors: [ 104] 38th Virginia
 [ 72%] ammunition available

The Federal Army has suffered losses of:
 [  4%]    160 men of all arms
   incl.[  0%]     38 prisoners of all arms
 [  4%]    160 bayonets
 [  0%]      0 artillerists
Honors: [ 503] 43rd New York
 [ 73%] ammunition available


The full orders of battle on this flank:


Division D.H. Hill - Attack
  [ 101] Major General D.H. Hill - Active B [875 paces]
    Brigade Jubal Early - Attack
    [ 102] Brigadier General Jubal Early - Active B [500 paces]
 [ 101] 5th North Carolina                0/ 390      C+    
 [ 102] 23rd North Carolina               0/ 412      C     
 [ 103] 24th Virginia                     0/ 420      C     
 [ 104] 38th Virginia                     0/ 501      C-    
    Brigade Gabriel Rains - Attack
    [ 103] Brigadier General Gabriel Rains - Active B [450 paces]
 [ 105] 13th Alabama                      0/ 392      C+    
 [ 106] 26th Alabama                      0/ 410      C     
 [ 107] 6th Georgia                       0/ 490      C-    
 [ 108] 23rd  Georgia                     0/ 490      C-    
    Staff Duncan McRae
    [ 104] Colonel Duncan McRae - Active B [875 paces]
    Regiment Edward McCarthy - Attack
    [ 105] Captain Edward McCarthy - Active B [225 paces]
 [ 109] 52nd Virginia Militia             0/ 518      D+    
 [ 110] Richmond Howitzers                0/  46 [ 2] C-    
 Strengths:
  losses/active
       0/  4023 Bayonets
       0/    46 Artillerists
       0/     2 Cannon
       0/  4069 Total of all arms
              9 Colors present

Division William Smith - Attack
  [ 501] Brigadier General William Smith - Active C+ [800 paces]
 [ 505] 1st New York Battery              0/ 150 [ 6] C     
 [ 506] 3rd New York Battery              0/  92 [ 4] C     
    Brigade Winfield S. Hancock - Attack
    [ 502] Brigadier General Winfield S. Hancock - Active B+ [500 paces]
 [ 501] 5th Wisconsin                     0/ 412      C     
 [ 502] 6th Maine                         0/ 412      C     
 [ 503] 43rd New York                     0/ 514      C-    
 [ 504] 49th Pennsylvania                 0/ 482      C-    
    Staff George A. Custer
    [ 504] 2nd Lieutenant George A. Custer - Active B [950 paces]
    Brigade John Davidson - Attack
    [ 503] Brigadier General John Davidson - Active C+ [400 paces]
 [ 507] 7th Maine                         0/ 380      C     
 [ 508] 33rd New York                     0/ 481      C-    
 [ 509] 49th New York                     0/ 485      C-    
 [ 510] 77th New York                     0/ 522      C-    
 Strengths:
  losses/active
       0/  3688 Bayonets
       0/   242 Artillerists
       0/    10 Cannon
       0/  3930 Total of all arms
             16 Colors present


Sunday, July 31, 2016

Search For The Holy Grail-The Best Napoleonic Rules, Part 4

Continuing with Part 4 of this series, the rules Black Powder by Rick Priestley are today's subject. Admittably a big fan of Hail Caesar, the Ancients/Medieval rules with the same philosophy as Black Powder, I was looking forward to testing Black Powder out on a Napoleonic tabletop.

Black Powder


Disclaimer: After reading many opinions of these rules, it seems like gamers either love Black Powder or they hate it. I tried to approach the rules with an open mind.....and was pleasantly surprised.

Black Powder is, what I consider, a modern set of Napoleonic rules. Many aspects of horse and musket warfare are streamlined and abstracted in favor of playability. I think that it is safe to say, after reading the authors' comments throughout the book, that these rules are primarily intended to be a gentlemen's game rather than a strict simulation. The rules are also not intended primarily for tournament play (although there are point lists for those inclined) but for historical scenarios. Black Powder also covers a wide range of time, from the early 18th century to the dawn of the 20th century. Therefore there are many generic aspects to the rules.  The "special rules" are intended to add the necessary flavor for a particular period. For many gamers, the rules are too generic.....but I think that can be a strength of  Black Powder. Both the Seven Years War and the Franco-Prussian War can be played with Black Powder, and both periods do have some similarities, but there are many other differences that these "special rules" address. The rules give a gamer a foundational set of rules, but the authors allow the gamer to research period tactics and apply many "special rules" in order to flesh out a particular battle. For me particularly, I love this approach; the research and building of a scenario is a large part of the gaming experience.  I approached Black Powder with the question of whether the rules did contain enough period flavor to give a truly Napoleonic feel to a game.

The system itself is very smooth and straight-forward (and not a lot of charts to constantly look up), especially when compared to "old school" rules like Empire or From Valmy to Waterloo. The turn sequence is simple enough:  Blue team issues commands and moves, Blue team fires, Blue team
conducts melee. Then it's up to the other side (Red team) to repeat the process. Easy.

As for commands and movement, I admire the ease of the system yet appreciate the gaming challenges when things do not go as planned.  In Black Powder, the gamer first announces what he wants to do with a unit, group of units, or entire brigade. At this point, the brigade commander rolls a 2d6 and compares it to his individual command rating. A roll equal to or one lower than the rating allows one move, a roll 2 less than the rating allows two moves, and a roll 3 or more less than the rating allows up to 3 moves. Sometimes, the unit(s) does what the commander intends and sometimes it doesn't. There are modifiers to this roll as well, such as command distance, etc. The closer a unit comes to an enemy unit, there is the option to allow for battalion commander "initiative" and make one move for which a brigade commander roll is not required. I like that. Rolled boxcars force a "blunder" roll in which the unit (s) behave in a wildly unintended manner. I'm not convinced of the historical accuracy of the procedure, but it really gives a rollicking good game. By the way, if a player forgets to announce the intended action for the unit, a "blunder" roll is required..........did I mention that it's a "gentleman's game?" 

In Black Powder, units are classified as Tiny, Small, Standard, or Large. Specific numbers of figures per unit are not critical, although rough numbers for each size classification are given. Unit frontages are more important and these recommendations are also covered. As for unit statistics, each one has musketry, melee, morale ratings, stamina, and special rules. For musketry and melee, these ratings equal the number of dice thrown. (Yes, these rules do have a "bucket load of dice" mentality.) The morale rating is not the number of dice thrown, but the rolls required on the dice used for saving throws. The stamina rating details the number of "hits" that dictate a Shaken status (which contains negative modifiers).

For example, a typical French line battalion would be described in the following way:

1/42nd Ligne    Melee (6)    Fire (3)   Morale (4)    Stamina (3)     Reliable (in column or mixed order)

Reliable is a special rule which means that this particular unit has a bonus applied to its command roll for movement when it is in an Attack Column with or without skirmishers deployed. Makes sense from a historical concept (French Napoleonic infantry).

So how does combat work for this unit?

In a nutshell, the above unit would roll 6d6 in melee and hit on rolls of 4-6. If firing, the unit would roll 3d6 and hit on rolls of 4-6. When hit itself, if this unit was hit 2 times either in melee or by fire, the unit would then roll 2 saving dice and require a 4-6 score (morale rating) to eliminate the hits. If the unit suffers 3 or more hits (that were not saved) than the unit becomes Shaken as per the Stamina rating. Attached leaders may attempt to rally if attached (requires a successful command roll and, essentially, removes a "hit").

Dice rolls for hits can also be modified against the standard roll of 4-6 needed for a hit. For example, a charging unit receives a +1 bonus for charging and would hit on a 3-6. Morale rolls can be modified as well.

The rules lay all of this out very clearly with many examples of melee, musketry, artillery, and skirmish fire. Whether you agree or disagree with the mechanisms contained in the rules, everything is discussed in detail. The book itself is very well written and beautifully illustrated / photographed.

After playing out the Maida scenario with Black Powder, I had mixed feelings toward the rules. Overall, it was a very enjoyable game. Playing the French, I was frustrated with the inability to conduct a flanking maneuver around the British right flank. I just couldn't seem to roll well once the units were outside nominal command range. This in itself, limits the "nipply little battalion" syndrome that many rules allow. To succeed with Black Powder, you truly have to be very organized with command rolls and maneuvers.  I ended up focusing my main assault on the center of the British line but, due to special rules, the British infantry included bonuses for first volleys and ripped my attacking columns up. Uh.....this sounds like the historical result for Maida....I thought that this was merely a game with added chrome. The bottom line is that, despite the ease of play and simple mechanics, Black Powder can give a reasonably historical game that is loads of fun. After looking back on our game, it was truly enjoyable and very quick (total time for this small battle was a little over an hour).

Now, I will say that the basic rules do not contain many of the period details that I normally enjoy. For example, the procedure for units forming square versus cavalry are a bit too streamlined and do take away from the normal "rock, paper, and scissors" aspect of Napoleonic gaming. Another aspect of the game concerns casualties; I really needed to view "hits" as reduction in morale steps for a unit rather than actual figures hit.....I'm sure that was the author intended, but I needed to change my way of thinking. Skirmishers seem a bit too powerful (although detached skirmish companies actually do what they were intended for). Combat results also seemed to depend a bit too much on the "luck" factor; let's face it, Black Powder does base many results on the multitude of die rolls that a gamer will be faced with. I do think that the "luck" factor is a bit too powerful in these rules, but I can see why many gamers love this approach......although this philosophy takes away some certainty in combat results, it does add fun.

Here is the dirty little secret that Black Powder contains.......it is considered a "toolkit" for gamers. I have seen many gamers publishing their own "house rules" to layer more detail onto the basic rules. Taking this account, anyone can add a myriad of details to Black Powder to create whatever type of game he wants. Are the vanilla rules fine for an enjoyable evening of gaming? Absolutely. Can more "special rules" and "house rules" be added for a more detailed Napoleonic experience.....Absolutely.

So, in summary, I rated Black Powder in terms of playability a 9 out of 10. I found the rules refreshingly simple to play and very entertaining.  I am typically a "simulation" guy who likes a lot of detail in my games........after adding the "special rules" that I felt were appropriate, I simply had a great time gaming Maida.

I rated the rules in terms of historical accuracy/realism a 6 out of 10. This was a little tougher for me than the Playability rating. A gamer can literally add as much or as little chrome as preferred. A deep knowledge of the period is not critical, but does allow one to create a scenario that comes close to mirroring history.  For me, the emphasis on the die rolls (the "luck factor") is a bit too heavy to qualify as a historical simulation.......but, if you have the patience, unit statistics and the use of "special rules" will bring a scenario closer. Black Powder, in the eyes of many, really is more of a game with flavor rather than a simulation. And that's ok with me.

The Total rating for Black Powder is 7.5 out of 10. Rick Priestley's Black Powder offer a helluva good time.....